Conan Mercer Site Reliability Engineering Team Lead
Guide to Setting Up an Inexpensive Media Server
14 Apr 2021 - Conan Mercer
The Problem
For a long time I wanted to have my own dedicated media server, mainly for streaming films and shows to my TV on demand. I had looked into using a Raspberry Pi based system, tempted because of the power efficiency and small footprint. However, at the time of writing the Raspberry Pi 4 goes for about 60€, which is a bit more than I would like to pay, especially because that would not be the final price. I would still need hard drives, solid state drives, power supply's, micro sd cards etc. So for quite some time I parked this project. That was until I built a brand new computer system, blog post here. My old computer was now gathering dust, until I realized that I now had pretty much everything that I needed to build a Media Server, which was going to cost not much more than my time.The System
The system ended up costing 43.88€, because I reused old parts. I had originally purchased these parts for a computer that I built in 2014, and at the time that build cost about 450€, to say that I have got value for money out of those parts is an understatement. I used that system to complete my Ph.D degree, and also about 2 years of remote working after my research. In total I received a good 6 years of active duty from this machine, and hopefully many more as a repurposed server.If I did not have the benefit of having access to these old parts to reuse, I would have bought an old system on ebay for cheap. Something like an old but reasonably powerful Dell OptiPlex. In short there are many old systems on ebay that can be bought on the cheap that can be repurposed into a basic server.
The parts used in my server build are as follows:
| Type | Item | Price | |
|---|---|---|---|
| CPU | AMD FX-8320 | n/a | |
| CPU Cooler | Cooler Master Seidon 120v | n/a | |
| Motherboard | MSI 970A-G43 | n/a | |
| Memory | 16gb DDR3 1600MHz | n/a | |
| Power | Corsair CX500 V3 80+ Bronze | n/a | |
| Ethernet | D-Link DGE-528T (Wake on Lan supported) | 11.98 | |
| Storage | Seagate Barracuda Green 1 TB | n/a | |
| Storage | Western Digital Blue WD10EZEX - 1TB | n/a | |
| Storage | Western Digital Blue 500GB SATA | n/a | |
| Boot Drive | Intel 530 Series 180GB | n/a | |
| Backup Boot Drive | Intel 530 Series 120GB | n/a | |
| Video Card | NVIDIA GeForce 210 | 11.90 | |
| Case | RAIJINTEK Arcadia Midi-Tower | n/a | |
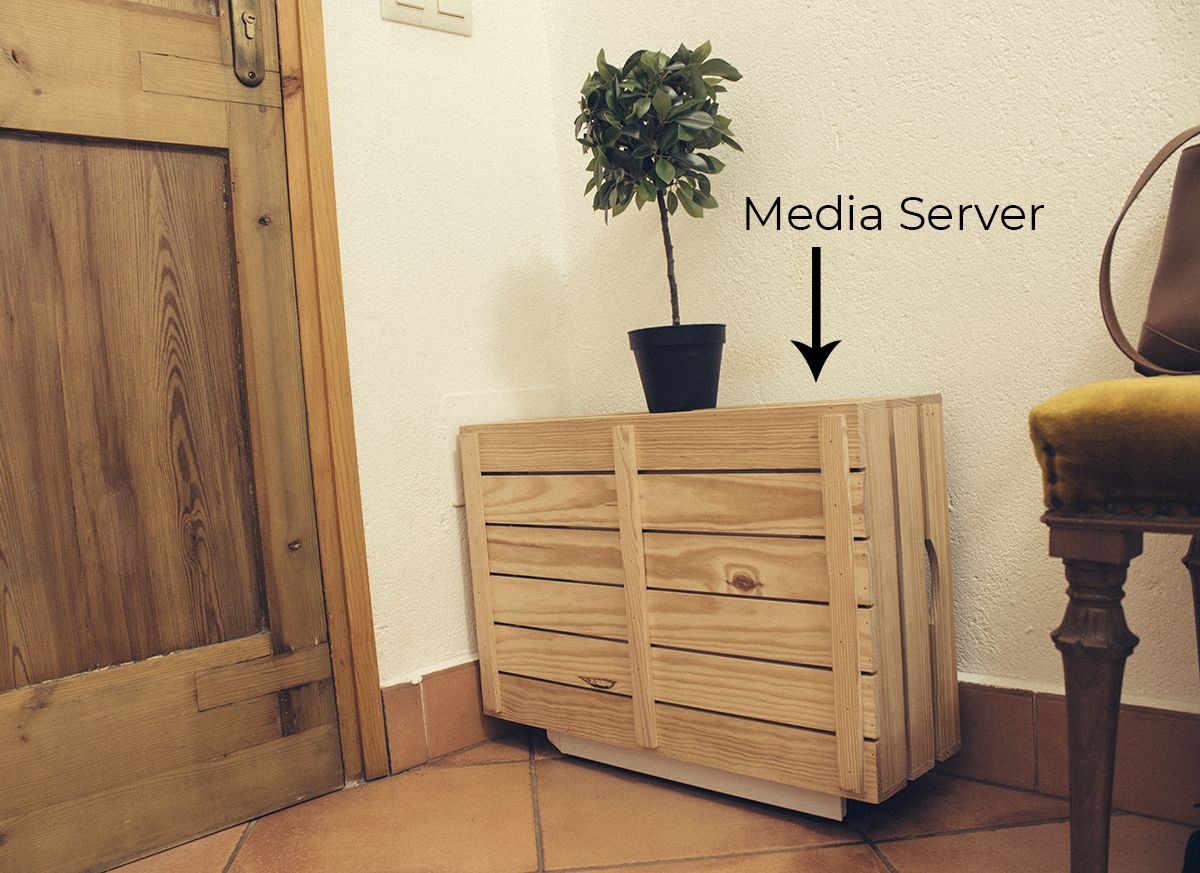
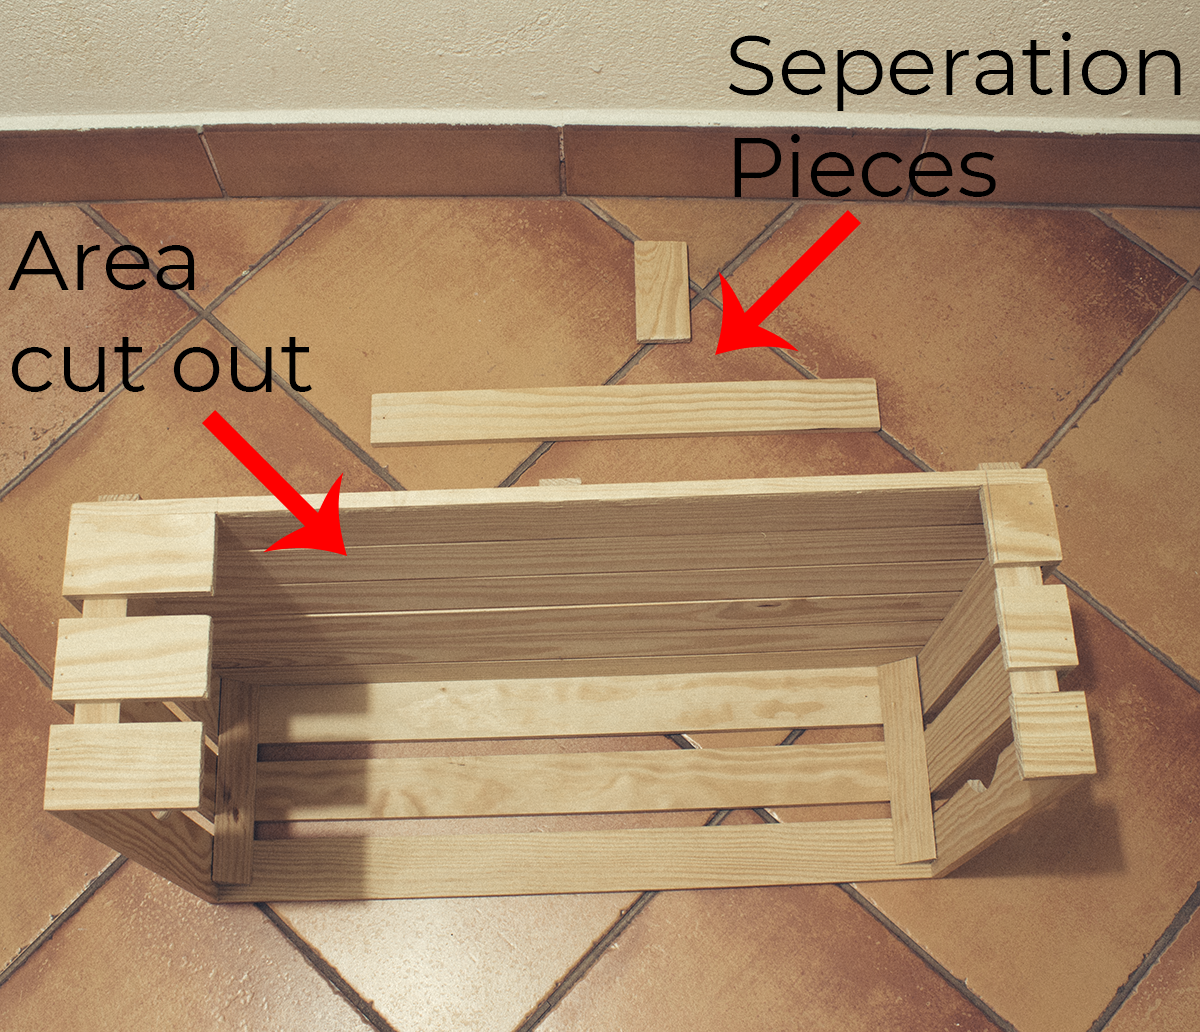
| Case | Wood Box | 20 | |
| 43.88€ | Total |
I purchased a WoL capable ethernet card from ebay (discussed later), and a cheap GPU so that the output resolution is greater than what the motherboard can produce (discussed later). I also bought a wooden box used as a case.
Connection to the Local Network
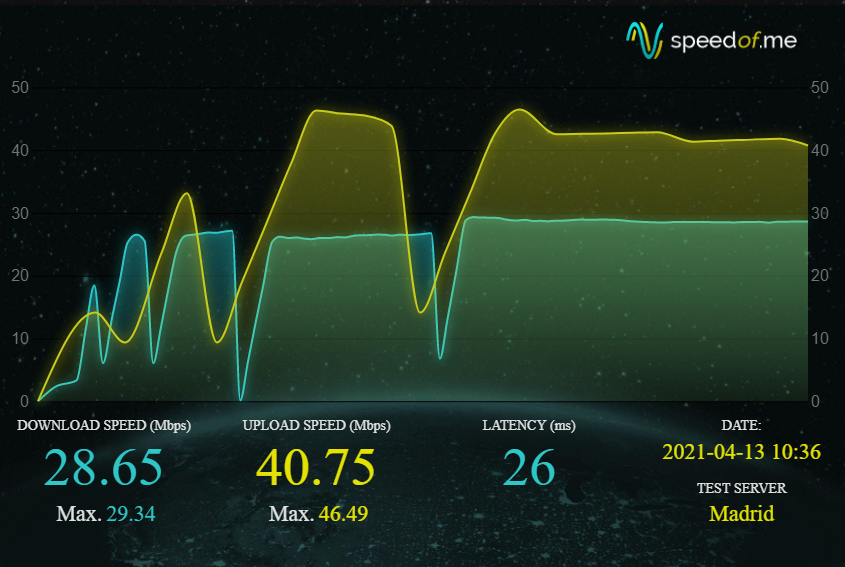
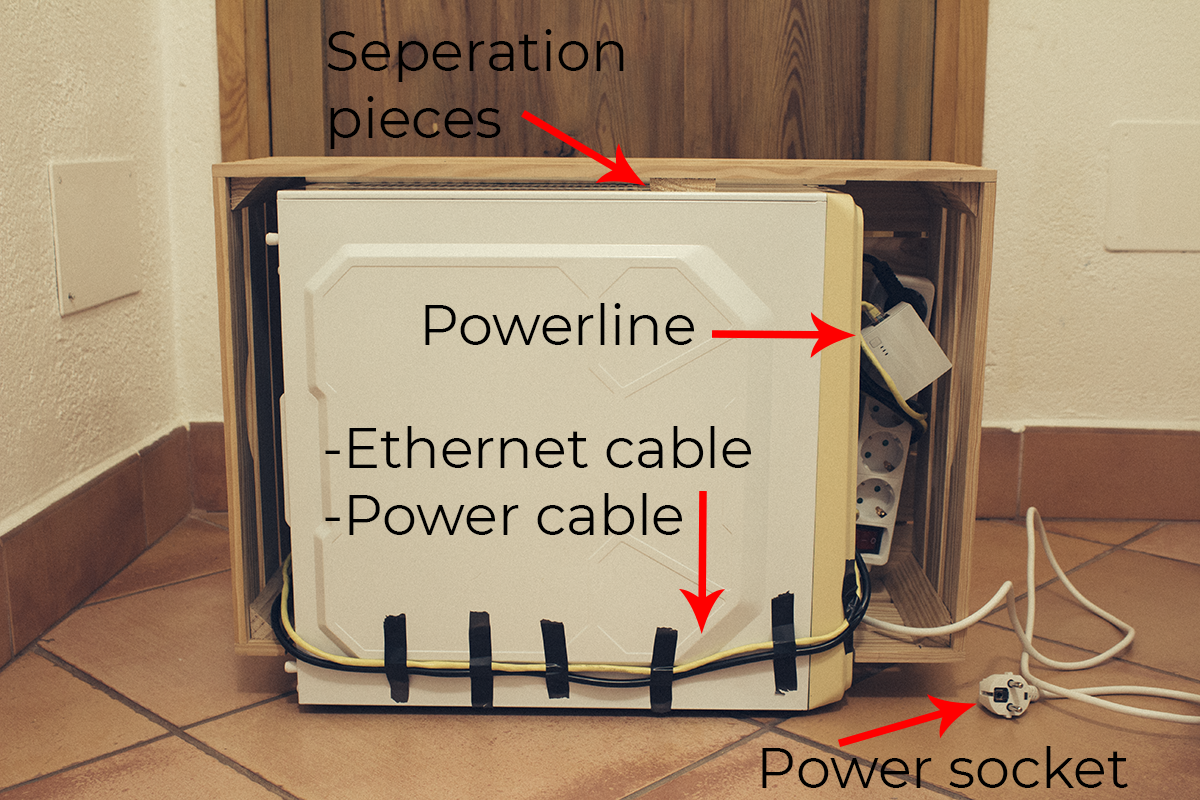
This server is more than 10 meters and a few thick walls away from the router, so WiFi is not practical. Also, my house does not have built in CAT5 cabling, so my best shot was a powerline adapter. I had a few of these in storage so I pulled them out for this build. A powerline adaptor connects the server to the router by utilizing the homes electrical wiring. Think of it as a hassle-free version of ethernet. It works by sending a frequency through the electrical wiring of the house, which is then turned back into computer readable signals at each end. One powerline goes into the server, the other into the router.The powerlines used here are rated for 600Mbps, but that is theoretical and not what is observed in practice. Using the powerlines the server gets about 28Mbps up and 40 down. This is not even close to the speed of my fiber internet connection, so the powerline is a huge speed bottleneck, but it should be enough for streaming purposes.
Camouflage Construction
For this build I wanted stealth, but before the cool stuff comes, a good spring cleaning was in order. This process consisted of vacuuming any large pieces of dust out, and once that was done, I used Isopropyl alcohol with a tissue paper to clean off all the remaining pieces of dust and dirt. You can buy Isopropyl alcohol very cheap in most supermarkets or hardware shops.
Besides a clean, I smartened up the cable management somewhat, mainly to allow for better airflow, not aesthetics as the inside of the case will not be visible to the outside world.
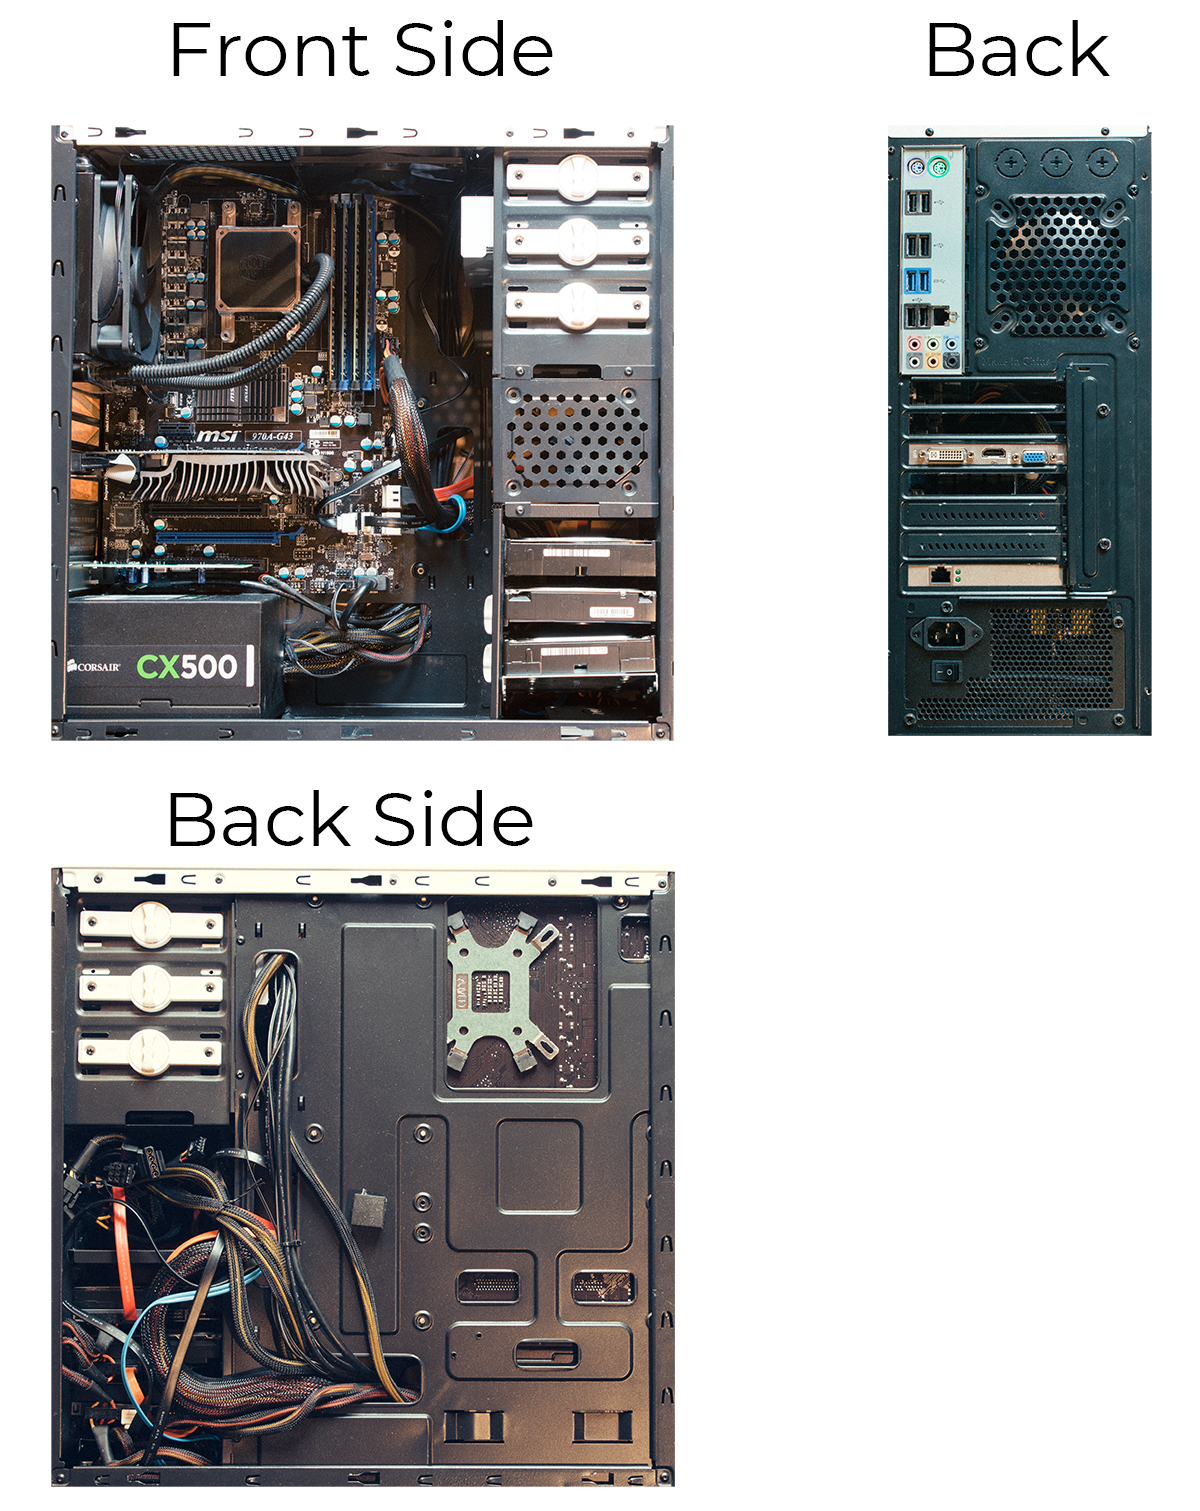
Most of the components are displayed in the Front Side photograph below. The hard drives are all located on the bottom right of the server (3 HDDs, 2 SSDs), the WoL ethernet card is positioned in a PCI slot just above the power supply on the bottom left, and above that is the GPU in another PCI slot.
Operating System
For now, the server uses the Windows 10 operating system. In the future I will look into FreeNas and other offerings, mainly out of curiosity. For now, Windows 10 is doing exactly what I need this system to do.Plex
I will not write at length about Plex here, but it is very easy to install, a good guide is present hereRemote Desktop Connection
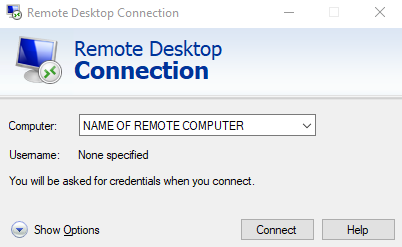
Because the server is headless (has no monitor attached) it is useful to be able to connect to it via another computer over the local network in order to configure settings. There are many software offerings that can achieve this, such as Team Viewer. But I find that the native windows Remote Desktop Connection works the best. In Windows 10, search for 'Remote Desktop Connection', then add the credentials of the server. This will be the name of the server and any username and password that it uses.For the remote desktop connection to work efficiently, I purchased a very cheap GPU from ebay. Without this GPU, the output resolution of the motherboard was ridiculously low (640x480).
Wake on Lan
I wanted this server to be as power efficient as it could be. Most of the time the tendency is to leave servers on all the time. This seems to me a colossal waste of power. There is also an economic cost, which depending on where you live in this world may be prohibitive. Lastly, in theory the hardware will fail prematurely if it is powered constantly.Ethernet controller
The answer to this problem is Wake-on-LAN (WoL) which allows a computer to be turned on or awakened by a network message.
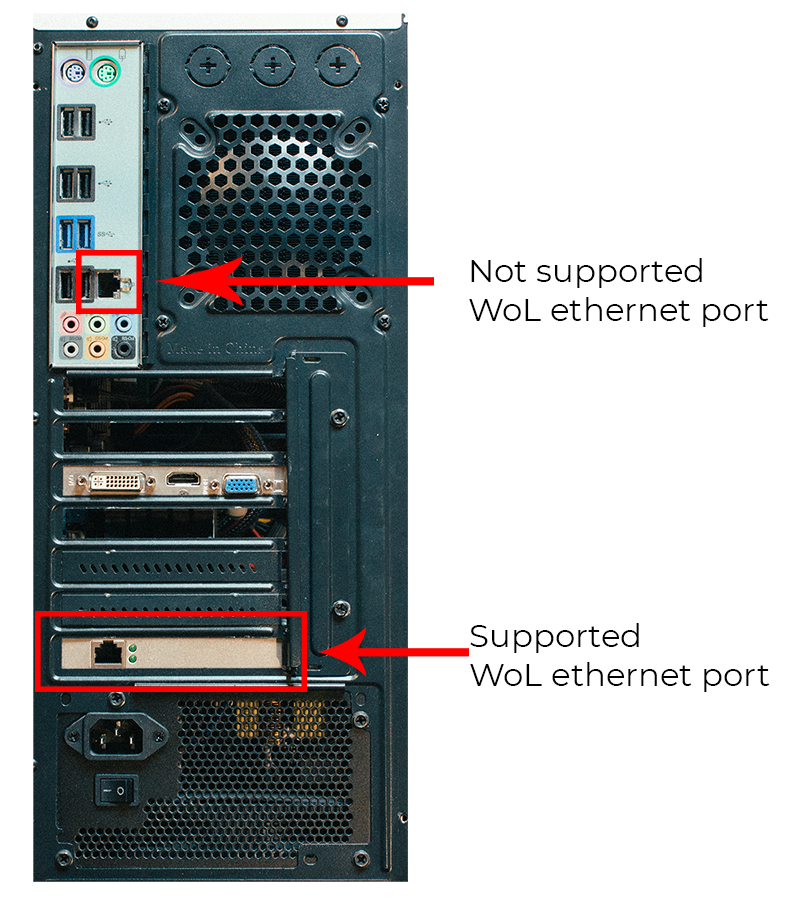
First and foremost, WoL requires an ethernet card that supports this standard. The motherboard in this server is a MSI 970A-G43, which has an integrated ethernet controller, a Realtek PCI-E GbLAN controller 8111E.
This controller does not support WoL, so I needed to buy a PCI Gigabit Ethernet card that does support WoL. A quick scout on Amazon and I found the D-Link DGE-528T for 12€. I installed this into the server.
BIOS
After the card is installed, the BIOS also needs to be adjusted to support the WoL function correctly. To enter the BIOS, restart the server and press the Del key on the keyboard. Once the BIOS menu appears, you will need to peer around the settings pages to find the Wake-on-LAN settings. On this MSI motherboard, it is part of the "Resume By PCI-E" setting. Here is the configuration that works on this motherboard.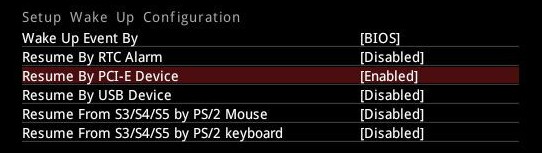
Windows 10 Settings
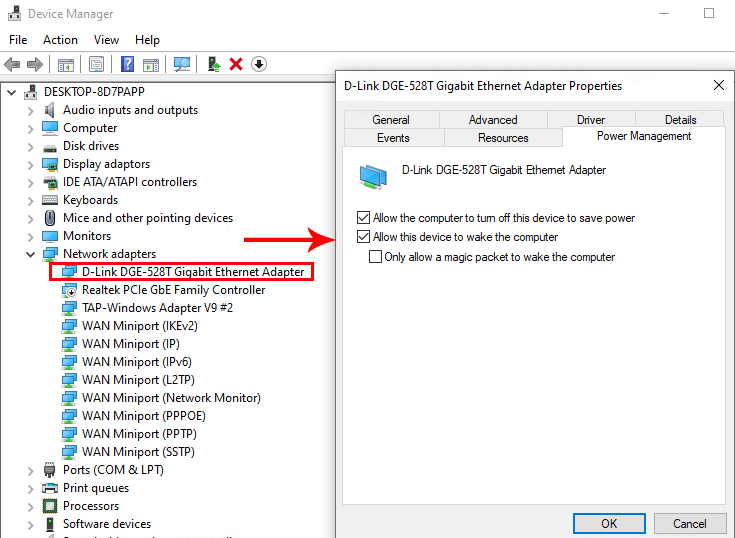
At this point, the server has a WoL capable ethernet card installed, and the BIOS is supporting the supply of power to the ethernet card. Now, the operating system needs to be setup up to support it, so when the system shuts down it essentially tells the card to go into a WOL state. Open the Device Manager and find the Network Adapters section, and expand it to reveal your network interfaces. Right-click on the Ethernet adapter — mine is called “D-Link DGE-528T Gigabit Ethernet Adapter” and select Properties. Next, click on the Power Management tab in that same window and check the first two boxes, leave the last box unchecked:- Allow the computer to turn off this device to save power
- Allow this device to wake the computer

The server now goes to sleep after 5 mins of inactivity. It boots back up automatically when the Plex client on my TV is turned on, and also anytime I connect to it via Windows Remote Desktop Connection.
Automatic Boot Drive Backup
Since I have two SSDs, the second drive is most suited to backing up the boot drives image. For this I used the built in Windows 10 Back up and Restore setting. These settings can be found in Control Panel, under Back up and Restore. The back up is scheduled for every Sunday at 7pm, and the second SSD is chosen to store the back up on.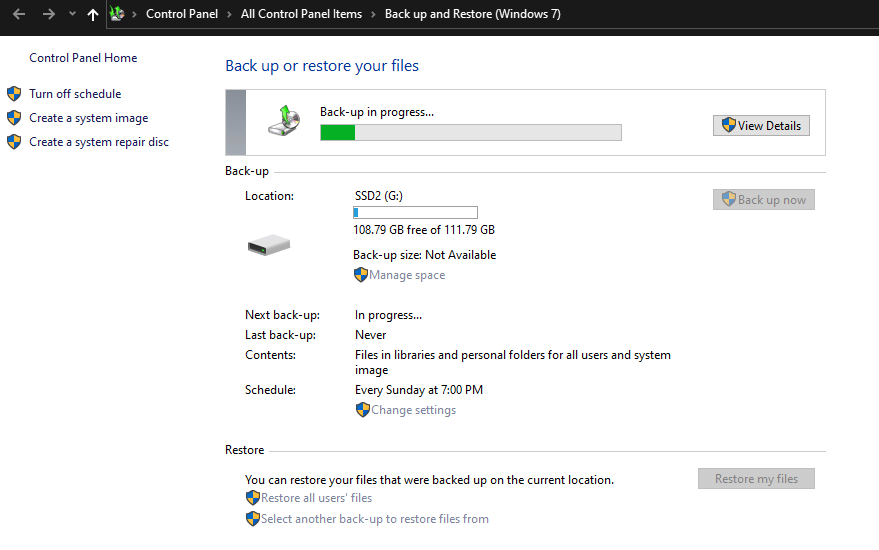
Power Efficiency
Reducing the power consumption was a concern during the design of this server build. Mainly because the CPU used is quite power hungry by todays standards. To test for this, I used the TECKIN Smart Plug to measure power consumption of the server in various states.
The server idles at an average of 120 watts, which is not a huge power consumption, but compared to my new computer build, blog post here, that idles at an average of 60 watts, there is a significant 66% increase in power. This is not surprising as the server hardware is much older and less power efficient.
The server sleeps at about 5 watts, which compared to its idle state is a difference of 184%. This is a wonderful result, the benefit of WoL and its contribution to power saving is clearly evident here.

In Raspberry Pi 4 B idles at about 2.7 watts, and under load at about 6.4 watts (specs taken from here). This does not include any drives or other equipment necessary to connect with the Raspberry Pi in order for it to function as a media server. The server in sleep mode, and the Raspberry Pi in an idle state consume almost the same amount of power as each other. This is a valid comparison as the server will be in sleep mode most of the time, only awakening to stream films or tv shows for a few hours a day at most.

To test the server under load I used Userbenchmark, and using this test the server averages at around 151 watts. It is important to note that this load test is probably consuming more power than when the server is just streaming films or tv shows with Plex, but this is the result we have. Here there is a significant difference in power consumption between the Raspberry Pi and the server, this is a trade off between power and energy efficiency. This server is more powerful and offers much more capability and expansion than the Raspberry Pi, so for now, this tradeoff seems worth it.

Power Savings
The current price of electricity where I live is 0,170105 €/kWh.By using WoL and putting the server to sleep for most of the day, on average this saves 188€ on the electric bill per year.
| Hours per Day | € / year |
|---|---|
| 24 | 223 |
| 3 | 34.5 |
Conclusion
The media server works and is consuming as little power as possible for its hardware architecture. Per year, by putting the server to sleep when not in use, saves me 188€. The server is built at a very low cost, reusing old hardware where possible.
In the future I will add more storage space, and better 'nas' rated drives. I will also look into alternative operating systems, in particular one that supports WoL and efficient cross platform file sharing.
I may also look at undervolting or underclocking the current CPU, in an effort to bring down the power consumption. If that does not reduce the power significantly, I will also look into buying a cheap CPU that is less power hungry. It may be possible to remove the GPU to save power, as going forward it should be less necessary to connect to the server often.